From Design Asset to Finished Product: Working with the Hand Holding a Syringe Set
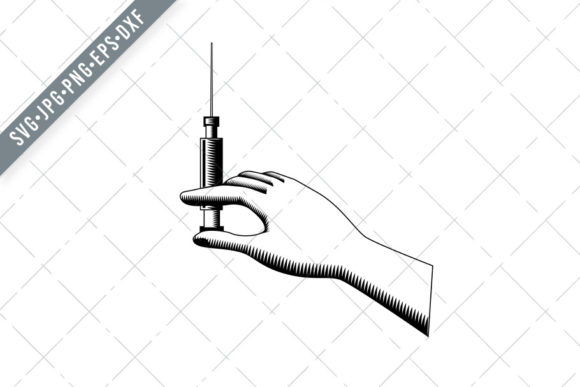
A single image—a hand gripping a syringe, rendered in a bold retro woodcut style—can anchor an entire project. Whether you are designing a medical-themed T-shirt, creating stencils for a studio wall, or assembling party invitations with an edge, the Hand Holding a Syringe illustration offers a versatile foundation. This design, presented in black and white on an isolated background, captures the stark contrast and tactile feel of traditional block printing. But the real value lies not just in the artwork itself, but in how you integrate it into your workflow.
This article walks through the practical process of taking this asset from file download to finished product. You will learn how the various file formats—SVG, PNG, DXF, EPS, and JPG—fit into different stages of production, how to plan your project around the design, and how to maintain consistency and quality across multiple uses. Whether you are a hobbyist with a home cutting machine or a small business owner fulfilling custom orders, the goal is to make the Hand Holding a Syringe set a reliable part of your creative toolkit.
Understanding the Asset: Retro Woodcut Style and File Formats
The illustration itself is a side-view rendering of a hand holding a hypodermic needle, drawn in a retro woodcut aesthetic. The black-and-white palette and high contrast make it suitable for both digital and physical applications. The isolated background simplifies compositing—you can place the image on any color or texture without additional masking work.
The set includes five file types, each serving a distinct purpose:
- SVG (Scalable Vector Graphics): The vector file for silhouette cutting machines like Silhouette Studio Cameo and Cricut. It retains crisp edges at any size and is the primary file for cutting paths.
- PNG (300 DPI, at least 10 inches): A raster image with transparency, ideal for screen printing, digital mockups, and web use. The high resolution allows for large-format printing without pixelation.
- DXF: A vector exchange format commonly used in CAD and some cutting software. Useful if you work with older or specialized cutting programs that do not support SVG natively.
- EPS: A vector format widely used in professional design software like Adobe Illustrator and CorelDRAW. It preserves layers and paths, making it easy to edit or combine with other vector elements.
- JPG: A standard raster image without transparency. Useful for quick previews, low-fidelity mockups, or printing projects that do not require a transparent background.
Having all five formats in one download means you can move between tools and production methods without re-creating the design from scratch. This is the first step in a smooth workflow: knowing which file to use at which stage.
Before the Project: Planning and Preparation
Every project benefits from a brief planning phase. Before you open your cutting software or design program, consider the following:
- End use and substrate: Will you cut the design into vinyl for a mug, screen-print it onto fabric, or use it as a digital element on a party invitation? The substrate affects file choice and scale. For vinyl cutting, use SVG or DXF. For screen printing, use PNG or EPS. For digital use, PNG with transparency is often best.
- Size and resolution: The PNG file ships at 300 DPI and at least 10 inches on the longest side. If your project requires a larger physical size—say, a 24-inch-wide poster—you may need to upscale the vector files (SVG, EPS, DXF) instead of the raster PNG to maintain sharpness.
- Color and background: The design is black on a transparent or white background. If your final product uses a colored substrate, test the contrast. The woodcut style works well on light and mid-tone surfaces. On dark materials, consider a white or light-colored vinyl cutout instead.
- File organization: Create a dedicated folder for the Hand Holding a Syringe set. Keep all five formats together. Name them clearly (e.g., “hand-syringe-svg.svg”, “hand-syringe-300dpi.png”). This habit saves time when you return to the asset months later for a reorder or new product line.
These preparation steps take five minutes but prevent frustrating mid-project format mismatches. They also help you maintain consistency if the design is used across multiple items in a product line—for example, a T-shirt, a tote bag, and a sticker all featuring the same illustration.
During Production: Integrating the Asset into Your Workflow
The actual production stage is where file compatibility and tool knowledge come together. Here is how the Hand Holding a Syringe set interacts with common workflows.
Cutting Machines (Silhouette Studio Cameo, Cricut)
For physical cut projects like vinyl decals, stencils, or iron-on transfers, start with the SVG file. Import it directly into your cutting software. Because the design is already a clean vector with no extra elements, you can typically skip the trace step. Check the path—sometimes a complex woodcut line might have overlapping nodes. Use the software’s node editing tool to simplify if needed. Scale the design to fit your material, then send the cut command.
If your cutting software prefers DXF over SVG, use that file. The DXF version preserves the same vector paths and should load without geometry errors. After cutting, weed the excess material and transfer the design to your substrate.
Screen Printing and Heat Transfer
For screen printing, the EPS file is ideal because it opens natively in Adobe Illustrator or CorelDRAW. You can separate the black areas into a single color layer, create a halftone effect if needed, or combine the hand with other text or graphics. Export the final screen-ready artwork as a high-resolution PNG or PDF. If you are printing on fabric, reduce the design to one color (black) for a clean, cost-effective screen. The woodcut texture provides visual interest even in single-color prints.
For heat transfer vinyl (HTV), use the same SVG approach as with regular vinyl. Mirror the design before cutting if your material requires a reverse application.
Digital Design and Print-on-Demand
When creating digital products—such as printable wall art, greeting cards, or social media templates—the PNG with transparency is your primary file. Drop it into Canva, Photoshop, or Affinity Designer, resize as needed, and layer it over your background. The 300 DPI resolution ensures it prints cleanly at sizes up to 10 inches or more. For larger digital banners, upscale the SVG version rather than the PNG to avoid pixelation.
If you are designing for print-on-demand platforms (like Redbubble, Teespring, or Printful), you may need to prepare a mockup first. Use the PNG on a stock model image to visualize placement, then replace it with the final print-ready file before submitting.
After the Project: Quality Control and Long-Term Use
Once your product is made, take a moment to evaluate the result. Check the alignment of the cut, the sharpness of the print, and the contrast of the design against the substrate. If you used vinyl, ensure the edges adhered fully, especially in the narrow areas of the syringe needle. The woodcut style can create fine lines that are beautiful but may be fragile in physical form. If you find the needle tip is too delicate for vinyl, consider simplifying that area in your vector editor before cutting again.
For long-term use, archive your project files along with the original asset. If you created a modified version (e.g., recolored or rotated), save that as a separate SVG or EPS file with a descriptive name. This way, when you reorder the product or expand the line, you do not need to redo the work. The Hand Holding a Syringe set becomes a reusable component in your design library, not a one-off download.
Practical Implementation Tips by Project Type
Different projects benefit from different approaches. Below are specific workflow examples for common use cases.
- T-shirt design: Use the SVG to cut a heat transfer vinyl mask, or use the EPS to create a one-color screen print. Keep the design small (4–6 inches wide) for a centered chest print. The retro woodcut style pairs well with sans-serif text underneath.
- Mug or tumbler: Cut the design from permanent vinyl using the SVG. Size it to fit the curve of the mug—typically 8–10 inches wide when flattened. Weed carefully around the syringe barrel and hand contours. Apply with transfer tape and burnish firmly.
- Stencil for wall art or furniture: Cut the design from stencil vinyl or mylar using the SVG. Secure the stencil to the surface with low-tack tape, then apply paint with a foam roller. The isolated black areas become negative space in the final piece.
- Greeting cards or invitations: Use the PNG with transparency in a card template. Print on cardstock at 300 DPI. Combine with a bold typography headline on the front for a clean, graphic look.
- Scrapbooking or party decorations: Scale the SVG down to 2–3 inches and cut from adhesive cardstock or vinyl. Layer multiple cutouts for a dimensional effect. The black-and-white palette means it coordinates with almost any color scheme.
Organizing Your Digital Assets for Efficiency
When you work across multiple projects—perhaps a handful of T-shirts one week and a batch of invitations the next—your file organization system directly impacts your speed. Keep the Hand Holding a Syringe set in a master folder named “Medical Illustrations” or “Woodcut Designs.” Inside that folder, store all five formats. If you create derivatives (e.g., a mirrored version, a resized version, or a version with a simplified needle), add a subfolder named “Modified Versions” with notes on the change.
Use consistent naming conventions: include the design name, file type, and a brief descriptor (e.g., “HandSyringe_SVG_original.svg”). This makes searching fast and reduces the chance of accidentally using the wrong file. When you are on a deadline, a well-organized asset library is a productivity multiplier.
Putting the Set to Work
The Hand Holding a Syringe illustration is not just a decorative graphic—it is a production-ready asset that fits into a repeatable workflow. By understanding the role of each file format, planning your project before you start, and applying the right file to the right tool, you can move from idea to finished item with fewer revisions and less waste. Whether you are producing one custom mug or a small product line for a shop, this design set gives you the flexibility to execute across multiple mediums without redesigning the artwork each time.
Open the download, review the files against your upcoming project list, and start with the SVG or EPS as your base. Test a small batch first, then scale up. The combination of a strong visual concept and a structured, file-based workflow turns a single illustration into a durable piece of your creative practice.